Nicoise in a Jar

IMG_1952

I like things in jars, and here is another good use for the many jars I have laying around.

Putting salads in Jars is a great way to make things them of time, and to keep the salad fresh, and develop flavors while they sit in the fridge.

The order of the layering is important, as keeping the lettuce away from the moist ingredients keeps it crisp, while allowing some to touch the dressing improves their flavor – in this case the tomatoes and onion.

They also look, really pretty. Depending on how tightly packed the jar is  you may be able to eat directly from the jar (shaking to mix), or as I had, added to a plate or bowl to mix and eat.

Nicoise is a classic French salad, I didn’t use olives as I didn’t have any, and used capers instead of anchovies for a salt hit.

The tuna, egg, potato and beans make a very filling salad. If you wish, replace the eggs and tuna with white bans or chickpeas for a vegan alternative.

You need two large size clean jars for this recipe,  mine where 750mls, but you can add more or less lettuce to fit a slightly smaller or larger jar.

IMG_1931

Ingredients: for two large jars (these make a BIG salad for one).

2 tins of tuna slices in oil, drained

2 boiled eggs cooled, and sliced.

1 cos lettuce, washed, spun and torn into pieces

10 cherry tomatoes – halved

1 red onion – diced

6 baby potatoes, steamed, cooled, cut into slices.

250 gs of green beans, steamed lightly and cooled, cut into thirds

2 tsp of capers

2 tbs of olive oil

1 tbs of red wine vinegar

Salt and Pepper

Steps.

1. Add oil, vinegar and salt and pepper to the bottom of the jar.

IMG_1932

2. Add tomatoes, onions and capers.

IMG_1934IMG_1935IMG_1939

3. Add tuna.

IMG_1941

4. Add the potato slices, carefully so that they are flat and cover the bottom layers completely.

IMG_1945IMG_1943

5. Add the green beans to cover the potato.

IMG_1946IMG_1947

6. Add the egg, reserving a couple of slices to arrange vertically against the jar for decoration.

IMG_1948

7. Place the decorative eggs slice against the glass, add the lettuce to ‘hold’ up the egg and fill the jar.

8. Screw on lid, and refrigerate until you want to eat!

IMG_1951

Txx

Chia Seed Pudding Jars!

IMG_1869

Here is another low fructose , highly nutritious recipe inspired by Sarah Wilson (http://www.sarahwilson.com.au/).

Although there are may recipe variations for these available on the net, in  paleo, raw, vegan circles.

Chia seeds contain omega 3 fatty acids, fiber, protein, calcium and other nutrients.

I saw Sarah make these with Justine on “Everyday Gourmet'(http://www.everydaygourmet.tv/recipes/696-cashewy-chia-puddings) on channel ten, and since I have started watching my sugar intake decided to give them ago.

I use  lite coconut milk in mine because I’m not a fan of other dairy milk alternatives. However, Sarah makes her own cashew milk, and you can use any other nut milks, soy or dairy if you wish.

Really, you can use any flavorings, fruit, nuts etc you wish, to suit your style of eating. You may wish to alter the milk to seed ratio to vary the consistency.

This version uses low fructose berries, and I top with some nuts and a little shredded coconut.

A higher fructose, but more dessert like version that I have made, is adding half a fresh add before refrigerating and topping with half a banana when eating.

They do need to be chilled overnight to achieve a pudding consistency, and they last well for a few days in the fridge.

I generally eat them for breakfast, and sometimes as a snack.

Jars make the best containers, as they are easy to seal and shake when making them.

IMG_1866

Ingredients – Makes 2 jars

1 can of lite coconut milk or 270mls of liquid of your choice

2 tbs of chia seeds

hand full of frozen or fresh berries of your choice

To top – nuts of your choice and shredded coconut

Steps:

1. Wash and dry two small glass jar and lid.

2. Pour half of the coconut milk into each jar.

3. Add the half the chia seeds and berries in the jars.

IMG_1867

4. Seal the jar with lids, and shake vigorously.

IMG_1870

5. Pop the jars in the fridge overnight.

6. Top with desired toppings, and eat!!

IMG_1889

IMG_1886

Txx

A very lemony, 2 Whole Lemon and 1 Mandarin Cake

IMG_1272


WARNING: ONLY FOR LEMON LOVERS!

This cake is based on this recipe for a flour-less orange cake http://www.taste.com.au/recipes/14822/flourless+orange+cake . I had a surplus of lemons  (and a Mandarin)  so used them instead.

I have made flour based cakes like this, I love that there is no waste and you get an intense citrus flavor  (you also get all the fiber from the fruit). It’s citrus season in Australia at the moment, so its a perfect time to make a whole citrus cake!

This version is gluten free, if you use gluten free baking powder, and if you use a cooking spray to grease it is also dairy free. Using the almond meal adds fiber, good fats and vitamin E, however there is lots of SUGAR in the recipe

If using oranges or another combination of citrus you may be able to reduce the sugar or use another sweetener (not sure about how it will effect the texture of the cake). However, to counter the pith in the lemons you do need all that sugar.

Feel free to try different citrus or combinations : Orange and lemon (st Clemens), lemon and lime, grapefruit etc. Just try to keep the quantity to the equivalent of two oranges.

I was worried this was going to be a heavy cake dry cake, but it has a lovely texture, and is very moist. However, the almond meal makes it filling!

Serve  alone, with a little cream or even plain yogurt.

Ingredients:

2 lemons

1 mandarin

3 eggs

1 cup of castor sugar

300gs of 3 cups of almond meal

1 tsp of baking powder (or gluten free baking powder)

Syrup

1 lemon

3/4 of cup of caster sugar

1. Preheat oven to 170c. Grease and line with baking paper,  a 22cm spring form cake pan.

2. Place fruit in a saucepan and cover with cold water, bring to the boil on high heat and boil for 15 minutes. Drain fruit, return to pan and cover with cold water, boil for another 15 minutes (This apparently helps remove some bitterness from the pith).

3. Remove the mandarin from the pan, but boil lemons for another 10 minutes. Refresh Mandarin under cold water. After 10 minutes drain lemons, and refresh under cold water.

IMG_1285

4. Coarsely chop fruit, removing seeds. Add fruit to the bowl of a food processor and process until smooth.

IMG_1294

5. Add eggs and sugar to a bowl, and beat until pale and creamy. Add the orange, almond meal and baking powder and gently fold until just combined. Pour into prepared pan.

IMG_1280IMG_1293IMG_1297


6.  Bake for  appox, 1 hour or until a skewer inserted into the center comes out clean. Set aside for 15 minutes to cool (my cake was ready in 50 minutes).

IMG_1303

7. While cooling,  zest  and juice remaining lemon, add zest and juice to a pan with the remaining sugar. Stir over low heat, until sugar is dissolved and syrup thickens slightly.

IMG_1300IMG_1307

8. Turn cake onto a serving plate. Use a skewer to gently prick the top. Spoon over syrup. Serve.

IMG_1304

IMG_1314

Mexican Pickled Onions – Cebolla en escabeche

IMG_1205

These really jazz up your Mexican meal, they are easy and last a while in the fridge and the color is AMAZING!!

They are adapted from this recipe (the pork was also amazing, but I lost the photos I took 😦 ).

http://www.taste.com.au/recipes/25135/mexican+pulled+pork

IMG_1223

Ingredients:

6 red onions, thinly sliced

juice of a pink grapefruit

juice of an orange

juice of  a lime

1 tsp of sea salt

  1. Place onions in a  heat proof bowl, cover with boiling water and set aside for 1 -2 minutes.
  2. Drain, and refresh under cold water, return to bowl.
  3. Combine juice and salt, stir to dissolve salt. Add to onions.
  4. Refrigerate for at least an hour, the flavor and color will deepen.

These will keep in the refrigerator for at least a few days.

IMG_0906

Easy, Healthy Red Berry Crumble

IMG_1117

I’ve had half a bag of mixed berries in the freezer for awhile, and tonight I finally got around to doing something with them.

Crumbles are quick and easy, and also easy to give a bit of a healthy makeover. There were lots of ‘healthy recipes’ out there: low fat, no sugar, diary free etc. Today I decided to do a dairy free version without white flour.

As the berries threw a a lot of water when I heated them I added about a tsp of  corn flour,  you could leave this out or use an alternative thickener, you could sweeten the fruit if needed, I like my berries a little tart.

You could also use butter or another alternative fat.

Ingredients for 4 small serves:

3 cups of mixed berries

1tsp corn flour

Handful of rolled spelt (or grain of your choice )

handful of almond meal

Handful of toasted coconut

1.5 tbsp of coconut oil

  1. Preheat oven to 180c .
  2. In an oven proof skillet, combine berries and corn flour ( and sugar if using), heat on low until berries lose their frozen look and are shiny, and the smaller ones break down a little.
  3. Meanwhile combine the rest off the dry ingredients in a bowl. Add  oil and rub into dry ingredients with finger tips until combined (if weather is hotter oil will be liquid and can be simply stirred in).
  4. Top fruit with crumble mixture and bake in over for 10-15 minutes until browned and fruit bubbles at edges.

Serve as is, with some yoghurt or if you want to undo the healthiness with cream or ice cream.

If you don’t have an ovenproof skillet, precook fruit in a saucepan and transfers into a baking dish. If using fresh fruit  you may need to adjust cooking times.

Lamb Cutlets with Brazil Nut and Mint Sauce

Lamb cutlets are one of my favorite things! This sauce is based on a Jamie Oliver recipe  ‘Lamb Cutlets with

Special Basil Sauce’

However, I experimented with ingredients I had in hand.

IMG_1107

Ingredients:

Handful of brazil nuts

Bunch of mint

Small amount of parsley leaves

Good olive oil

Sherry vinegar

8 to 10 lamb cutlets

Lemon wedges to serve

  1. In a mortar and pestle, crush and grind nuts until a paste forms, add a little oil to help this along. Add mint and parsley and crush until incorporated into paste, start to add oil to desired consistency is reached, leave a little thinker than required. Add vinegar to taste. Season.
  2. Grill or Pan Fry Cutlets to your liking (I prefer medium). Serve with sauce ,lemon  and any salads or vegetables to make a meal.

I left it a bit chunky this time, so it was more of pesto.

IMG_1106

Using up Kale

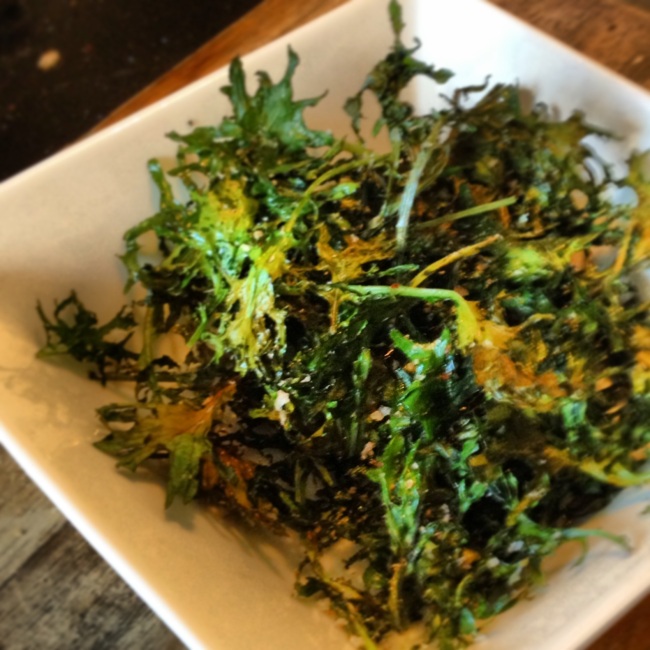
I had half a bag of baby kale left over from last night and needed something to do with it. I used some on a tuna sandwich, which was quite nice, but only used up a little.

I remembered seeing ‘kale chips’ on some Paleo sites in the past. So I searched for some recipes and found plenty. Some people gushed that they tasted ‘so much like potato chips’, and that they were a healthy way to satisfy those salty/crunchy cravings.

Well I love potato chips, but I don’t keep them in house or else they will get all eaten….by me and there goes 200 calories. Here is my attempt.

Ingredients for about 2 cups after cooking

half a bag of baby kale (Woolworths carries this, please use other any kale you can find)

about a tablespoon of good olive oil

sea salt flakes (or other salt)

Heat oven to 180c. Line a baking tray with baking paper. Mix kale with oil in a bowl, and lay out in a single layer on tray. Bake for about 10 -15 minutes. Kale should be dry and crunchy, can can take it further until the edges brown if you wish. Place in bowl and mix in sea salt to taste.

Image

Well,  I can’t say they were as goods as potato chips, but they did hit the crunchy/salty spot. They were as nice as other vegetable chips I’ve had. I think they are a good way to get a few more greens into the kids or man child in your life.

Next time I will try some different seasonings.

Have a Great Day!!

My first post!

My first post!

Last night I made my version of Kao Pad (Thai Fried Rice). Lately I have been trying to ‘eat well’ (lose weight), so I’ve been eating less carbs particularly at night. Unfortunately, I love rice, and have been craving spicy Thai fried rice. I checked out a number of recipes and came up with this one. I have use ‘quick rice’ but if your more organized  you can of course cook your own.

Also my recipes will be never be very accurate, please alter to your taste…

Image

Recipe for four generous serves:

1 large packet of Jasmine ‘2 minute’ rice

Oil for frying (I used rice bran oil)

Aromatics

small piece of ginger finely copped

3 or so coriander roots finely chopped

2 small hot chillis finely chopped

3 kaffir lime leaves finely shredded

1 stick of lemon grass finely chopped

2 cloves of garlic finely chopped

Meat , Veg and Eggs

3 eggs

1 onion diced

3 chicken thigh fillets diced

2 carrots diced

200gs Mushrooms ( i used shimeji)

100gs finely shredded cabbage

half a bag of bean sprouts

half a bunch of spring onions (white part) finely sliced

Sauce

juice of a lime

2 tsp of white sugar

fish sauce to taste

1 tsp soy sauce

2 tsp oyster sauce

To Serve

Boiled eggs

Coriander leaves

Lime quarters

  • Cook rice, so that it cools and drys out a bit ( I believe the proper way to make fried rice, is to pre-cook, lay out on trays and refrigerate so the rice stay separate)
  • make a simple omelet with eggs, roll and slice
  • combined and stir sauce ingredients to dissolve sugar
  • heat about 2 tbs of oil in a wok or fry pan
  • fry aromatics until fragent
  • add onion and chicken and stir fry until chicken is almost cooked
  • add carrots and cook for another minute
  • add mushrooms and cabbage and cook for another minute
  • add sprouts, spring onion and omelet and combine
  • Add rice and combine, and stir through sauce, cook until all is heat through
  • Serve in bowl with topping of your choice.
  • YUM


Not quite as good as my local take away, but the rice and good whack of chilli and lime really hit the spot!